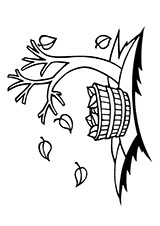
A large number of crafts contain trees. It is not always possible to draw a tree beautifully so that it can then be cut correctly. The following images may help you in your creativity. Choose the tree you like, download it and cut it out, having previously printed it on an A4 sheet.
Download tree for paper cutting
All trees are of excellent quality, and should be printed on normal sized sheets of writing paper.
Download free tree stencil
Paper cutting is an ancient art form that involves creating intricate designs by cutting out shapes from paper. It’s a versatile craft that can be enjoyed by people of all ages and skill levels. One popular motif for paper cutting is the tree, a symbol of nature, resilience, and growth.
Materials for Paper Cutting Trees
To create your own paper-cut tree, you’ll need a few simple materials:
- Paper: Choose a medium-weight paper that is easy to cut but not too flimsy. Options include construction paper, cardstock, or even recycled paper.
- Scissors or a craft knife: A sharp pair of scissors or a craft knife will allow you to make precise cuts.
- Pencils and erasers: Use pencils to sketch your design and erasers to make any necessary adjustments.
- Cutting mat: A cutting mat will protect your work surface and provide a stable base for cutting.
Steps for Creating a Paper Cutting Tree
- Sketch your design: Start by sketching a basic outline of your tree on paper. You can find inspiration from real trees or create your own unique design.
- Refine the details: Once you have a general outline, add details like branches, leaves, and bark texture. Consider using different patterns or shapes to add visual interest.
- Transfer the design: Carefully trace your pencil sketch onto the paper you’ll be using for the final cut.
- Cut out the design: Using your scissors or craft knife, carefully cut out the tree design. Start with the larger shapes and gradually move to smaller details.
- Refine and embellish: Once the main design is cut out, you can go back and add finer details or embellishments using a smaller blade or a sharp pencil.
Creative Ideas for Paper Cutting Trees
- Create a forest scene: Cut out multiple trees in different sizes and arrange them to create a miniature forest scene. You can add other elements like grass, flowers, or animals.
- Decorate cards and gifts: Use your paper-cut trees to decorate greeting cards, gift tags, or even wall art.
- Make a mobile: Hang multiple paper-cut trees from different heights to create a beautiful and delicate mobile.
- Use as stencils: Use your paper-cut trees as stencils to create patterns on fabric, furniture, or other surfaces.
- Incorporate into other crafts: Combine paper-cut trees with other crafts like origami or quilling to create unique and dimensional pieces.
Tips for Successful Paper Cutting Trees
- Use sharp blades: A sharp pair of scissors or craft knife will make cleaner cuts and reduce the risk of tearing the paper.
- Cut slowly and carefully: Take your time and focus on making precise cuts. Don’t rush the process.
- Start with simple designs: If you’re new to paper cutting, start with simple designs and gradually move on to more intricate ones.
- Practice on scrap paper: Before cutting out your final design, practice on scrap paper to get a feel for the technique.
- Use a cutting mat: A cutting mat will protect your work surface and provide a stable base for cutting.
- Have fun and be creative: Paper cutting is a great way to express your creativity and explore different designs. Don’t be afraid to experiment and try new things.
Paper cutting trees is a fun, creative, and eco-friendly craft that can be enjoyed by people of all ages. With a few simple materials and a bit of patience, you can create beautiful and unique paper-cut trees that can be used to decorate your home, gifts, or crafts. So grab your scissors or craft knife and some paper, and let your creativity soar!